 Thumbprint cookies are some of my favorite cookies. I love their versatility, and how easy it is to creatively adapt them to any celebration or party. So these Snowflake Thumbprint Cookies are a celebration of winter and snow, and the fact that I am not in any snow!
These cookies are part of a care package that I am sending to my old neighbor, Skip. As I have mentioned before in this post, he was the best neighbor ever, and since we moved away from Utah, we have gone to visit with him a few times. We really miss him! My son was there a few months ago, and I asked him to go see Skip. I was a little worried that he seemed out of sorts and forgetful when I spoke to him on the phone. To make a long story short, Skip has dementia, and he is now living in a care facility in east Ohio, very near his family. While I am so glad his family is watching out for him, I am so sad, because I know how much he loved his home in Utah, and his life there. Anyway, I know that Skip will be happy to get these goodies, and I hope they make him smile!
( printable recipe ) (recipe makes 7 dozen cookies) 1 cup Butter 1 cup Confectioner’s Sugar 1 cup Granulated Sugar 2 Eggs 1 teaspoon Vegetable Oil 2 teaspoon Vanilla 2 tablespoons Lemon Juice 5 1/4 cup Flour 1 teaspoon Cream of Tartar 1 teaspoon Baking Soda Pinch of Salt 1 cup Confectioner’s Sugar 1 cup Water Wilton Sky Blue for icing White Chocolate Bar Preheat oven to 350 degrees  In a separate bowl, mix together flour, cream of tartar, baking soda, and salt. Set aside. Beat the butter on medium until fluffy. Add both sugars and mix together well. Add the eggs, oil, vanilla, and lemon juice. Mix together. Add the dry ingredients to the butter mix and mix well.
  Using a 1 tablespoon scoop place your scoops of dough on the baking sheet. Use your hands to roll each scoop into a smooth ball. You can use your eye to judge the size, if you do not have a scoop.
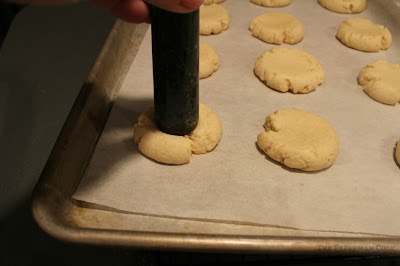
 Use a pestle to form a dent in the cookies. If you do not have a pestle, you can use the back of a spoon, the back of a measuring spoon, or your thumb, hence the name thumbprints!
 Bake 9-11 minutes. The cookies will get brown on the bottom of the cookie, but they will not brown on top. If they do they are too done. Remove baking sheet from the oven and use the same utensil you used before to make the thumbprints again. Place on a cooling rack to cool completely. To make your frosting, mix together the confectioners sugar, water, and color. Add icing to the thumbprint of the cookie and let dry.
  Before the cookies dry completely, shave a little white chocolate from a bar.
 Sprinkle on to tops of the cookies. Add white round sprinkles at the same time. I added these little snowflakes I already had from a local cake decor supply store.
I am shipping these in this tin box. I covered the lid with scrapbook paper that I picked out to coordinate with the cookie theme, and to make it look so much prettier! Thanks for joining me today! Here are some other cookie recipe you might enjoy!:
 Simple and Sweet Heart Sugar Cookie
 Valentine’s Day Butter Cookie Gift

